Yale Home Module Support
FAQ
The Yale Home module can be installed in a number of Yale Home Smart Locks.
Yale Home Smart Locks*
- Yale Home App Smart Lock
- Smart Lock Pro
What is included in the Yale Home Kit?
The kit comes with a Yale Home module, and the Yale Connect Wi-Fi bridge.What is the Yale Connect Wi-Fi bridge?
The Yale Connect bridge allows your module to connect to the internet, which gives you the ability to control your lock from anywhere using the Yale Home app. Remote features include, being able to check your door status, lock and unlock your door from anywhere and grant access to others. In addition, installing the Yale Connect gives you access to existing Yale Home integrations – including Google, Amazon Alexa, Apple Home Kit, Samsung SmartThings.What app do I download to use with the Yale Home module?
The Yale Smart Locks work with the Yale Home app. This free app can be downloaded from the App Store or Google Play Store.How is this different from Yale's other lock without the Yale Home Module?
The Yale Home module allows a user access to a Bluetooth experience – Unlock on arrival, door position sensing (when DoorSense is installed) and remote access and access to numerous integrations such as Google, Amazon Alexa, Apple Home Kit, Samsung Smart Things (when connected with the Yale Connect Wi-Fi bridge).Can I use Yale Home on my current Yale Bluetooth lock?
Yes – Please be aware that use of the Yale Home module will deactivate all the settings done via the lock.


Troubleshooting
If you run into issues with your Yale Home Module, the following troubleshooting tips should be helpful. The "How to install Yale Home Module" article in How-to Guides below provides information and visuals to assist with installation.
Registering your module
Follow steps below to enter the Programming Menu on the host lock to register your module:- Enter the Master PIN code on the keypad, then select the R or I button
- Press '7', then “#”
- This completes the registration process for the module
The number 7 does not appear on the keypad
If the number 7 does not appear on the keypad, it may be due to any of the following reasons:- The Master PIN Code is not set
- The module is not properly seating within the lock
- The lock is not compatible with the Yale Home module
Note: Module setup is not possible until after the Master PIN Code has been configured. Follow the Master PIN Code registration steps below.
- For YRD series
- Press the Gear button in the lower right hand corner of the keypad
- Press 1 or follow voice command to create a Master PIN Code - listen closely to the audio instructions if your model supports this feature
- Enter a Master PIN Code that is between 4-8 digits long
- Press the Gear button to complete PIN creation
- Press the upper right Previous (P-arrow) option or listen closely to the audio for instructions
After completing the PIN creation steps, press any key on the keypad to calibrate the lock and complete setup.
- For other locks
- Touch the lock face to wake up the keypad
- Put the default master pin code
- Click I or R button at the back of the lock
- Click 1#
- Setup new master pin code: Input your master pin code (4-10 digits)
- Click #
- Input the master pin code again
- Click #
- Click R button at the back
If the module is not properly seated within the lock
If the module is not properly seated in the lock, you may receive a Module Communications Error. In the event that this happens, first remove one battery from the lock. Wait 10 seconds, then reinsert the Yale Home module, then replace the battery. Listen carefully for lock sounds as it powers back up. Check the lock to see if the error comes up again. PLEASE NOTE: It is critical that the battery is removed before the Yale Home Module is removed and reinserted.
If you continue to receive the Module Communications Error, you may need to physically factory reset the lock. PLEASE NOTE: When a lock is factory reset, all user codes including Master PIN Code are deleted and all programming features will be returned to their default settings. Follow the steps below:- Remove the battery cover and batteries from the lock
- Remove the interior escutcheon to access the reset button within the lock
- The reset button is located beside the PCB cable connector
- Reinstall the batteries while holding down the reset button for a minimum of 3 seconds and then release
- Replace the battery cover
Upon reset, Master PIN Code creation is the only option available and must be performed prior to any other lock programming. Follow the steps listed above to complete Master PIN Code creation.
If the lock is not compatible with the Yale Home module
In the event that your lock is incompatible with the Yale Home module, you will be unable to complete setup. Please review the deadbolt compatibility list in the "What Deadbolts are Compatible with Yale Home?" article in FAQ above to ensure that your lock is listed. If you are unsure what model lock you have, the model number for your lock is located on the inside of the battery cover.
If none of the above, you may need to factory reset the lock.
You can find the factory reset method for each lock on the lock manufacturer's website. Please note that when the lock is factory reset, all existing settings and PIN codes associated with the lock will be erased and reset to default settings.In order for your Yale Home Smart Lock to work, the module and the host lock need to communicate with one another. Miscommunication between your module and lock will result in a module communication error. This error is potentially caused by one of the issues listed below.
PLEASE NOTE: Some of these steps must be performed by a lock Owner.
Additional troubleshooting steps below:The Module was improperly removed
In order for the module to communicate with the host lock, it needs to have been inserted in the proper order. The Yale Home module should only be removed when the lock is powered down. If you need to remove the module, remove at least one battery from the lock first in order to cut the power supply. Once you have placed the module back into the lock, it is okay to put the battery back in and power up the lock again.The module needs to be registered/re-registered
You may receive the Module Communication Error if the Yale Home module is improperly registered. In this case, the following steps should remove the error:
Using the keypad, enter the Programming Menu on the host lock. First:- Enter the Master PIN code to get to the Programming Menu
- From the Programming Menu, select the R button
- Press the number '7', then ”#”
- Exit the menu by selecting the 'Previous' button (the red back arrow in the upper left corner) or wait for the menu to time out
This completes the registration steps and can now verify that the error has been removed.
The module was removed from one lock and placed in another
If the module was placed in a new host lock, the lock settings and PIN codes stored in the module can be synced to the new host lock. Follow the in-app steps to complete this process. The module will need to be registered with the lock by following the steps above.
If the module has been placed in a new host lock, the lock setting and PIN codes can also be erased and set back to default by performing a Factory Reset on the module (in-app) and lock (physical).Other
The Module Communication Error may also occur when:- A factory reset is pushed to the Yale Home Smart Lock
- The module is incorrectly removed from the lock while the batteries are still inserted
- The module has been switched out of one lock and into another one incorrectly
If any of the above has occurred, you may receive the Module Communication Error. Follow the steps below to remove the error:
- Remove a battery from your lock and wait 10 seconds
- Remove and re-insert the Yale Home Module
- Replace the battery and listen for the startup sound
Once you hear the startup sound, your lock is ready to use. Verify that the communication error is resolved by operating your lock. If you have tried all the troubleshooting steps above and you continue to experience the error, contact Customer Support.
HomeKit Reset - Yale Home Locks
If HomeKit fails to pair within the Yale Home App and/or the Apple Home app, attempt the below steps to reset HomeKit.
- Power-cycle both your iOS device and the lock.
- Retry the HomeKit setup.
Note: If the issue continues, try using another iOS device to operate HomeKit.
iOS users may be experiencing the inability to create 5-digit entry codes for their Assure locks on the first try. Users will be able to successfully create a code by editing the existing code to either 4, 5 or 6 digits.
You will be able to create 4- and 6-digit entry codes on the first attempt with no issue.
Always or Recurring Entry Codes remain in your Guest List within the Yale App until an Owner deletes them.
Temporary Entry Codes eventually expire and expiration is determined by the access end date. Once the code expires, the Entry Code is automatically deleted from your Guest List after 7 days.Why does this happen?
There is a maximum number of Entry Codes that you can store on your lock at one time. Automatically deleting Temporary Entry Codes after they expire is a way to free up lock memory storage for new Entry Codes.
How-to Guides
1. Remove battery cover
Using a Phillips-head screwdriver, loosen the battery cover screw. Slide the cover up and away from the lock.2. Remove a battery
Remove at least one of the batteries from your lock to power it off. Wait approximately 10 seconds for the lock to fully power down.3. Insert the module
With the Yale logo facing up, insert the module. Make sure it is properly seated in the lock.4. Replace the battery
Power up the lock by replacing any removed batteries.5. Replace the cover
Slide the battery cover down, and tighten the screw.6. Registering the Module
Follow the below steps to register your Yale Home Module with your lock.i. Registering your module on a lock with a keypad
Enter the Programming Menu on the host lock, by entering:- The Master PIN followed by the R or I button
- Next, select the number 7 followed by #
Here is the video instruction.
In the event that you don't see a 7 in your Programming Menu, review the following:
- Set a Master Pin. Setting up a Master Pin is required at the end of your lock’s physical installation
- The Module may not be properly seated
- Remove a battery, wait 10 seconds for the lock to properly shut down
- Remove and re-insert the module properly
- Replace the battery and listen to the lock startup sound
- The lock may not be a compatible model
- Check to see if your lock is compatible. Often, you can find the model number on the inside of the lock battery cover. You may need to factory reset the lock
ii. Registering your module on a lock without Keypad
When prompted to register your lock:- Locate the enrollment button, underneath the battery cover and next to the thumbturn
- Press and release the button after two seconds
This completes the registration process for the module. Next, set up the Yale Home lock in the Yale Home App. Please refer to "How to set up your Yale Home Module in the Yale Home App" article below for detailed instructions.
1. Lock Setup
Please make sure:- your lock's firmware is the most updated version
- your lock has batteries
- your lock is installed on your door
- Have a Master PIN code set up if your lock has a touch keypad
- Make sure your lock is in the advanced mode (For some models, you might need to manually switch to the advanced mode)
2. App Setup
Go into the Yale Home App and select the following: Set up a Device → Set Up A Lock. Your Lock is now set up.
Here is a video tutorial.DoorSense™ allows you to detect if your door is open or closed.
First, decide how you would like to install the DoorSense™
Yale Home provides two options for installation: a surface mount and a flush mount installation.
The surface mount installation requires the use of a screwdriver only.
The flush mount installation will provide a cleaner and less visible look with more robust performance, but does require drilling a 1.59cm hole into your door frame.1. Surface Mount Installation
Step 1. Determine mounting location
For optimal performance, DoorSense™ should be mounted within 3.8cm from the edge of your door frame, and should align with your lock’s Yale Home module.
NOTE: If you do not have a flat door frame or you have a perpendicular wall directly next to your door, the DoorSense™ can be alternatively installed on the perpendicular wall. The module should still be used as a guide for the recommended height of the DoorSense™ installation.Step 2. Attach mounting tape
Remove one side of the adhesive backing. Attach to the back of your DoorSense™, making sure to align the edges and screw holes. Remove the other side of the adhesive backing.Step 3. Place on door frame
Press the adhesive side of the DoorSense™ on your frame in the proper identified mounting position. Make sure to align the pill shape vertically.Step 4. Screw into frame
Hand tighten your DoorSense™ to the frame using the included screws.
You may wish to complete this step until after your lock is set up and calibrated to ensure that you are able to retrieve accurate door state readings before modifying your door frame.Step 5. Attach the cover
Press the cover onto the DoorSense™ unit.Step 6. Calibrate your Lock
Once the lock is set up, navigate to the Lock Settings and select Calibrate Lock and select LOCK AND DOORSENSE™. Follow the instructions in the app until you have successfully calibrated your Yale Assure and DoorSense™ together.
Open and close the door and validate that the door state is accurate. If it is not accurate or the calibration was unsuccessful, relocate the DoorSense™ housing closer to the smart lock and go through the calibration process again until you get accurate results.
If you elected to not insert the screws into the door frame, go back and insert the screws into the housing and secure them into your door frame or wall and place the cover over the housing.
If you notice that your readings are not accurate over time, perform another Door State Calibration to see improved performance.2. Flush Mount Installation
Step 1. Remove magnet from housing
Using a small blunt object, push the magnet carrier from the housing through the center hole. This may require some force.Step 2. Assemble magnet to cap
Expose the adhesive by removing the blue backing. Press the cap onto the notched side of the magnet carrier. The two shapes should interlock.Step 3. Mount in the frame
DoorSense™ will be flush mounted into the frame of your door, so your smart lock swings away when the door is opened. DoorSense should align with the lock’s Connected by Yale Home module.Step 4. Determine mounting location
Hand tighten your DoorSense™ to the frame using the included screws.
DoorSense™ should be mounted between 3.8cm and 8.9cm from the top edge of your deadbolt strike plate, centered on the frame. DoorSense™ should align with the lock’s Connected by Yale Home module.Step 5. Tape drill bit
It may be helpful to attach tape to your drill bit to mark the proper depth of hole to drill. DoorSense™ requires a 1.27cm deep hole, but it may help to use the assembled DoorSense™ as a guide.Step 6. Drill hole
Drill the hole in the proper location on your door frame, keeping the drill straight and steady.Step 7. Insert DoorSense into hole
Insert the DoorSense™ into the hole. If it is too snug to push in by hand, you can protect the frame with a piece of scrap wood and use light blows with a hammer or mallet.Step 8. Calibrate your Lock
Once the lock is set up, navigate to the Lock Settings and select Calibrate Lock and select LOCK AND DOORSENSE™. Follow the instructions in the app until you have successfully calibrated your lock and DoorSense together.
Open and close the door and validate that the door state is accurate. If it is not accurate or the calibration was unsuccessful, relocate the DoorSense housing closer to the lock and go through the calibration process again until you get accurate results.
If you elected to not insert the screws into the door frame, go back and insert the screws into the housing and secure them into your door frame or wall and place the cover over the housing.
If you notice that your readings are not accurate over time, perform another Door State Calibration to see improved performance.This article includes steps for setting your entry code access or your guests to your home.
Use the Yale Home App and follow the directions below to create entry codes.How it works?
Create Entry Codes For Owners
- Open the Yale Home App
- Go to the Guest List screen
- Select your profile
- Enter your preferred entry code
Here is the video instruction
Create Entry Codes For Guests
- Open the Yale Home App
- Go to the Guest List screen
- Select the yellow Invite button
You will be prompted to give your guest either App Access or Entry Code Only Access.
App Access - guests can access your lock using both the Yale Home App or the Keypad. Follow the steps below to give your guest App Access:
- Select App access
- Select either to invite the guest via their mobile number or from your saved contact on your phone
- Enter their mobile number or select their contact and then their mobile number from those listed
- Confirm access level (Guest or Owner or None) and App Access (Always / Recurring / Temporary)
- Enter your preferred entry code
- Then, send the invite
- The guest will be instructed to download the Yale Home App (if they haven't done so before) and then log in using the option: "I RECEIVED AN INVITE"
Entry Code Only - guest can access your lock using the Keypad only.
Follow the steps below for Entry Code Only access:
- Either invite the guest using their contact or add them manually
- Confirm type of access (Always / Recurring / Temporary)
- Then select SAVE CODE
- If you selected the option to text the code to your guest, your messages app will open up with a message that includes your guests code
- Send the text for them to receive
Here is the video instruction.
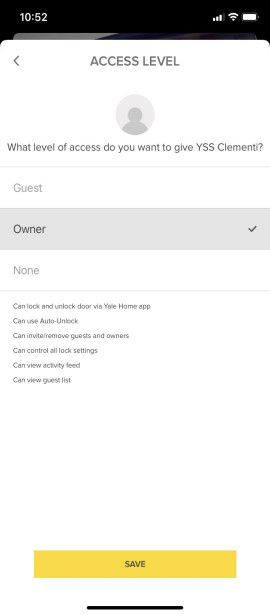
Yale Home offers 2 access levels: Owner and Guest. Guest is the default access level for anyone invited to your Yale Home Yale Assure, but you can update a person's access level when you invite them to your lock or at any time thereafter.
Read on iOS or Android (depending on your device) for steps to change Access Levels.
iOS
Changing a Guest to an Owner
- Open the Yale Home App and select the Guest Icon from the lower right in the menu
- Select the Guest you want to edit
- Select Owner to change the Access Level From Guest to Owner
- A blue checkmark will display beside your selection
- Select the back arrow to confirm changes
Your Guest is now an Owner, and will display as an Owner in your Guest List
You can change a user's access level back to Guest at any time by completing these steps again and selecting Guest from the Access Level options.
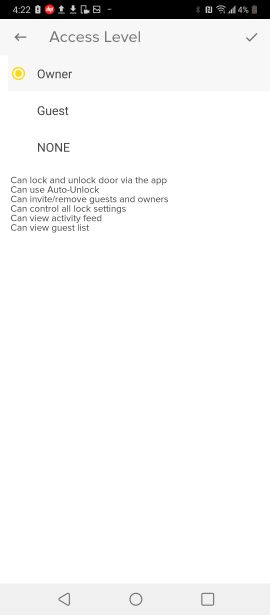
Android
Changing a Guest to an Owner
- Open the Yale Home App and select the Guest Icon from the lower right in the menu
- Select the Guest you want to edit
- Change the Access Level From Guest to Owner
- Select the "Save Changes" option at the bottom of the screen to save your changes
Your Guest is now an Owner, and will display as an Owner in your Guest List
You can change a user's access level back to Guest at any time by completing these steps again and selecting Guest from the Access Level options.
There are 3 access types: Always, Temporary, and Recurring. You can choose between three different access types when adding guests to your Yale Smart Lock.
You can modify access types for your existing guests in the Guests List or set them when you invite new guests.- Always - Guests have unlimited access, but the owner can change or delete their access at any time.
- Recurring - Guests have a scheduled access time that repeats. For example, guests are invited every Monday, Wednesday, and Friday morning from 8:00 am to 10:00 am.
- Temporary- Guests have a limited invitation to your home that expires. For example, guests have access for a one time use that is limited to the date and time you've selected.
Directions for setting and modifying access schedules are below
iOS
To make changes to access schedules:- Select the lock from the Keychain
- Go to Guest List
- Select a guest
- Go to Access Schedule
- Select either Always, Recurring, or Temporary
Always Access - Select Always access if you want to give your guest unlimited access to your lock.
Recurring Access - Select the day(s) and time windows you want to provide guest access to your lock for Recurring access.
Temporary Access - For Temporary access, select the time frame you want your guest to access to your lock.
Temporary guests have a limited invitation to your home that starts and expires at a specified time. For example, temporary access from 8:00 am 06/17/16 until Noon on 06/19/16. Click "Ok" when done to save updates.Android
To make changes to access schedules:- Select the lock from the Keychain
- Go to Guest List
- Select a guest
- Go to Access Schedule
- Select either Always, Recurring, or Temporary
Always Access - Select Always access if you want to give your guest unlimited access to your lock.
Smart Alerts are sent as notifications and let you know about the activity of your Yale smart lock. Many Smart Alerts appear in the Activity Feed.
Smart Alert options currently include manual lock events, user specific lock operations, notifications for when a door is left open, Auto-Lock notifications, and door locking with One-Touch Keypad operation (requires Yale Home Smart Keypad).
Over time, additional notifications and scheduling options will be added.
For the best Smart Alerts experience, we recommend that you pair the Yale Home Smart Lock with the Yale Connect Bridge.
Read on iOS or Android (depending on your device) below for information about smart alerts as well as steps to set them up.
Here is the video tutorial.iOS
Types of Smart Alerts
Note: Smart Alerts are only available after the Yale Connect bridge is connected. Users can select from five alerts::1. The Door is locked or unlocked manually
This alert notifies you when someone operates the Yale Home Smart Lock manually by hand or using a key.2. The door is locked or unlocked by a specific user
This alert notifies you when a specified guest or owner operates the lock via Bluetooth. This includes unlocking the lock using the app or Auto-Unlock.3. The door is left ajar
This alert notifies you if the door is left open for a specific amount of time. Specify the amount of time in the lock settings.4. The door is Auto-Locked
This alert notifies you when your Yale Assure Auto-Locks. Auto-Lock can be set up in the lock settings page.5. The door is One-Touch Keypad locked (only if Yale Home Smart Keypad paired with lock)
This alert notifies you when the Yale Home Smart Lock is locked using the One-Touch Lock feature on the Yale Home Smart Keypad.Creating Smart Alerts
Smart Alerts can be found in the Notifications section of your Lock Settings menu. To enable smart alerts:- Open the Yale Home App and navigate to the Lock Settings
- Select Smart Alerts
- Select the yellow button that says "Create a smart alert"
- Next, select “Choose an event” to choose which event triggers the smart alert
Android
Types of Smart Alerts
Note: Smart Alerts are only available after the Yale Connect bridge is connected. Users can select from five alerts:1. The Door is locked or unlocked manually
This alert notifies you when someone operates the Yale Assure manually by hand or using a key.2. The door is locked or unlocked by a specific user
This alert notifies you when a specified guest or owner operates the lock via Bluetooth. This includes unlocking the lock using the app or Auto-Unlock.3. The door is left ajar
This alert notifies you if the door is left open for a specific amount of time. Specify the amount of time in the lock settings.4. The door is Auto-Locked
This alert notifies you when your Yale Assure Auto-Locks. Auto-Lock can be set up in the lock settings page.5. The door is One-Touch Keypad locked (only if Smart Keypad paired with lock)
This alert notifies you when the Yale lock is locked using the One-Touch Lock feature on the Yale Home Smart Keypad.Creating Smart Alerts
Smart Alerts can be found in the Notifications section of your Lock Settings menu. To enable smart alerts:- Open the Yale Home App and navigate to the Lock Settings
- Select Smart Alerts
- Select the yellow plus (+) sign to create a new Smart Alert
- Next, select “Choose an event” to choose which event triggers the smart alert
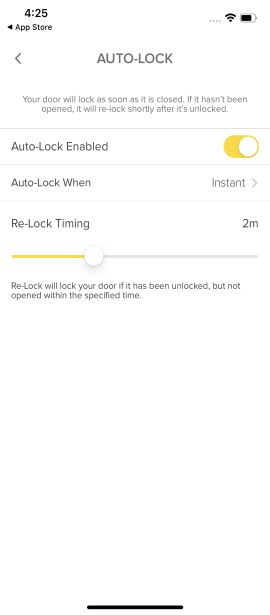
The Auto-Lock feature enables your door to lock automatically after a predetermined amount of time (up to 30 minutes) has passed.
To activate this feature you must be an authorized owner of the associated lock and be located within Bluetooth range of the lock you are enabling this feature on.
PLEASE NOTE: If you want to use the Auto-Lock Timing feature to control when your door locks after it closes, you must have DoorSense™ installed. Without DoorSense™, the door will lock automatically after it closes when Auto-Lock is enabledHow to Enable Auto-Lock on iOS
The following steps will help you set up the Auto-Lock feature on your iOS device:- Open the Yale Home App and select the applicable property from the keychain if there is more than one
- Tap the Settings Gear Icon in the lower right-hand corner on the lock circle screen
- Select the lock from the devices shown
- Select Auto-Lock, which is listed in the automations menu
- Toggle Enable Auto-Lock on and Set the Auto-Lock Timing
- Select Save Changes at the bottom
This completes the steps to enable the Auto-Lock feature on your Yale Home Smart Lock. Your lock will automatically lock after the amount of time set in Auto-Lock Timing.
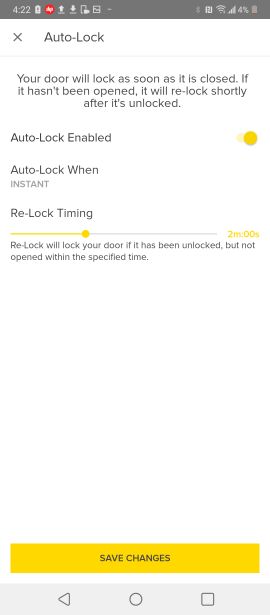
Conversely, if you want to disable the Auto-Lock feature, go through the steps above and Toggle Enable Auto-Lock off. You must be within Bluetooth range of the lock to disable this feature.How to Enable Auto-Lock on Android
The following steps will help you set up the Auto-Lock feature on your Android device:- Open the Yale Home App and select the applicable property from the keychain if there is more than one
- Tap the Settings Gear Icon in the top right-hand corner on the lock circle screen
- Select the lock from the devices shown
- Select Auto-Lock, which is listed in the automations menu
- Toggle Enable Auto-Lock on and Set the Auto-Lock Timing
- Select Save Changes at the bottom
This completes the steps to enable the Auto-Lock feature on your Yale Home Smart Lock. Your lock will automatically lock after the amount of time set in Auto-Lock Timing.
Conversely, if you want to disable the Auto-Lock feature, go through the steps above and Toggle Enable Auto-Lock off. You must be within Bluetooth range of the lock to disable this feature.Door Ajar notifications alert you when your door has been left open for a certain amount of time.
In order to set up Door Ajar notifications, you’ll need a Yale Home Smart Lock installed with a Yale Connect Bridge. For information on how to install DoorSense™, please review the "How to install Door Sense" section above.How to Create Door Ajar Notifications (iOS)
The first step in setting up Door Ajar notifications is to set Door Ajar Timing. The time increment selected determines how long your door can be open before you are alerted.
To set Door Ajar Timing:- Open the Yale Home App
- Go to the DoorSense™ section in Lock settings
- Tap on Door Ajar timing
- Set the amount of time.
After setting Door Ajar Timing, you need to set a Smart Alert to receive the notification.
To set this Smart Alert:- Go to the Smart Alerts page in the notifications section of your lock settings page
- Tap “Create a Smart Alert” followed by “Choose an Event”.
Select the event “the door is left ajar” and then select “Done”. Finally, tap “Save”.
You will now be alerted whenever the door has been left open for the time specified in Door Ajar Timing.How to Create Door Ajar Notifications (Android)
The first step in setting up Door Ajar notifications is to set Door Ajar Timing. The time increment selected determines how long your door can be open before you are alerted.
To set Door Ajar Timing:- Open the Yale Home App
- Go to the DoorSense™ section in Lock settings
- Tap on Door Ajar timing
- Set the amount of time.
After setting Door Ajar Timing, you need to set a Smart Alert to receive the notification.
To set this Smart Alert:- Go to the Smart Alerts page in the notifications section of your lock settings page
- Tap “Create a Smart Alert” followed by “Choose an Event”.
Select the event “the door is left ajar” and then select “Done”. Finally, tap “Save”.
You will now be alerted whenever the door has been left open for the time specified in Door Ajar Timing.
Here is the video instruction.Auto-Unlock is a feature that automatically unlocks your door when you arrive home, without having to reach for your phone or your keys.
If you're an iOS user, please read the article below on "How to Use Auto-Unlock for iOS" for more information about the Auto-Unlock feature.How it works?
Yale uses two states to enable Auto-Unlock to function: Home mode, and Away mode. These modes indicate where Auto-Unlock thinks you are: at home, or away from home respectively.
When you are at home (in Home mode), Auto-Unlock is not actively doing anything. It is waiting until you leave home.
When you approach your door, Auto-Unlock will unlock your door via Bluetooth. This means Auto-Unlock cannot operate your lock when you are away from home.
You are considered away from home when you leave your immediate neighborhood, which is about 200 meters, or a couple city blocks. It is only active when you return to your home area.Tips for good Auto-Unlock performance
Leave Wi-Fi and Bluetooth turned ON
Wi-Fi and Bluetooth must be enabled to use the Auto-Unlock feature. Your phone uses Wi-Fi and Bluetooth to determine your location. If your location is not accurate, Auto-Unlock will not work correctly or at all.Leave location services ON
Auto-Unlock uses phone’s location to determine when you are close to Home. Location services must be enabled in order for Auto-Unlock to work correctly.Location permission (Android 10 and higher)
Set location permission to "All the time".Take advantage of the notifications.
Android 8 and above use notifications to communicate to you about Auto-Unlock. Notifications for previous versions of Android can be turned on in the settings.Open and use the Yale Home App at least once a day.
This teaches the operating system that Yale Home App is a commonly used application.Whitelist the Yale Home App for battery savings (Android 9).
Preserve battery life by whitelisting the Yale Home App. From your home screen, go to Settings > Apps > Yale Home > Battery > Optimize Battery Usage.
PLEASE NOTE: These steps may vary from model to model. The column on the right has more info on specific phones (How to Enable Auto-Unlock on Android Phones with Custom Vendor Optimisation that Terminates Background Tasks).For best results: Enter and exit your home through the door where your Yale Home Smart Lock is installed.
If you enter through a door without Auto-Unlock enabled, the Auto-Unlock feature will still attempt to unlock the Smart Lock enabled door the next time it sees it. If you have a large house, this could be minutes or hours later.
If you plan to enter through a different door, you can cancel the Auto-Unlock through the notification that appears when you approach your home area.Home and Away Modes Explained
1. Home Mode
Nothing happens automatically.What does it mean?
You are assumed to be at home, and Auto-Unlock is not actively doing anything.How is it activated?
Automatically - You are placed in Home mode after Auto-Unlock successfully unlocks your door when returning home.2. Away Mode
Your phone will attempt to unlock your lock the next time you are near it. If you'd like to ensure your door is locked, please also set up Auto-Lock. Follow the instructions in "How to Enable Auto-Lock" article above.What does it mean?
You are assumed to have left home, as well as your immediate neighbourhood.How is it activated?
Automatically - You are placed in Away mode when your phone leaves the area around your home. This is typically about 200 meters away from your Yale Home Smart Lock, or a couple city blocks.
Manually - If you've suspended Auto-Unlock, you can re-enable it by simply opening the Yale Home App.Troubleshooting
My door didn’t unlock when I expected it to:i. You may not have gone far enough away from home
- To enter Away mode, you must go further than 200 meters or a couple city blocks. Only then will Auto-Unlock attempt to unlock your door when you arrive home.
- You can make sure Auto-Unlock tells you when you’re far enough away by enabling the notification. Auto-Unlock notification settings can be found in Lock Settings > Auto-Unlock.
ii. My door unlocked when I didn’t expect it to
- Auto-Unlock incorrectly thought you left home
- If you have very poor Wi-Fi or cellular connectivity. Your phone uses these to determine your current location.
- Auto-Unlock didn’t see your lock when you came home
- You entered through a door other than your Auto-Unlock enabled one.
- Bluetooth on your phone was turned off when you came home.
- Your lock’s batteries were very low.
How does Yale Home use my location data?
Your location data is only stored on your phone within the Yale Home App. Yale does not collect or store your data remotely, and has no way of looking at your location data. For more information, please see our Privacy Policy.How to Enable Auto-Unlock on Android Phones with Custom Vendor Optimisation that Terminates Background Tasks
In order to get Auto-Unlock feature to work with your phone, the Yale Home App needs to be able to occasionally run short background tasks . For these phones Auto-Unlock setup will direct you to the Settings where the Yale Home App can be added to “Ignore Battery Optimisation” list. In addition to that setting, for Huawei phones, the following steps on the right are necessary.Adjust your settings:
Go to Phone settings > Advanced Settings > Battery Manager > Power plan is set to Performance
Phone Settings > Advanced Settings > Battery Manager > Protected apps – check that the Yale Home App is set to Protected
Phone Settings > Apps > Yale Home App > Battery > Power-intensive prompt [x] and Keep running after screen off [x]
Phone settings > Apps > Advanced (At the bottom) > Ignore optimisations > Press Allowed > All apps > Find the Yale Home App and set to Allow
Some specific models such as Huawei, OnePlus, and Xiaomi have additional steps. If your model phone is below, include those steps to the above:Huawei P9 Plus:
Phone settings > Apps > Settings > Special access > Ignore battery optimisation > select allow for the Yale Home AppHuawei P20:
Phone settings > Battery > App launch and then set your app to “Manage manually” and make sure everything is turned on.Huawei Honor 9 Lite and Huawei Mate 9 Pro:
Phone settings > Battery > Launch and then set the Yale Home App to “Manage manually” and ensure everything is turned on.OnePlus
Phone settings > Battery > Battery optimisation and switch to the All apps list (Top menu) > Yale Home App > Don’t optimiseXiaomi
System Settings > Apps > Gear Icon > Special Access > Battery Optimisation
App battery saver: Security > Battery > App Battery Saver > Yale Home App > No restriction
Autostart: Open Security app > Permissions > Auto-start Enable Autostart for desired apps.
App pinning: When you open recent apps tray, drag your app downwards – it will be locked. So even if you clear recent apps it will not clear from the background. Drag downwards again to clear your app from the background.Auto-Unlock is a feature that automatically unlocks your door when you arrive home, without having to reach for your phone or your keys.
If you're an Android user, please read the article above on "How to Use Auto-Unlock for Android" for more information about the Auto-Unlock feature.How it works?
Yale uses two states to enable Auto-Unlock to function: Home mode, and Away mode. These modes indicate where Auto-Unlock thinks you are: at home, or away from home respectively.
When you are at home (in Home mode), Auto-Unlock is not actively doing anything. It is waiting until you leave home.
When you approach your door, Auto-Unlock will unlock your door via Bluetooth. This means Auto-Unlock cannot operate your lock when you are away from home.
You are considered away from home when you leave your immediate neighborhood, which is about 200 meters, or a couple city blocks. It is only active when you return to your home area.Home and Away Modes Explained
Home Mode
Nothing happens automatically.What does it mean?
You are assumed to be at home, and Auto-Unlock is not actively doing anything.How is it activated?
Automatically - You are placed in Home mode after Auto-Unlock successfully unlocks your door when returning home.
Manually - You can place yourself in Home mode by visiting Auto-Unlock Settings > Advanced Settings, and switching from Away mode to Home mode.Errors
In cases where your state cannot be determined, Auto-Unlock may default back to Home mode. These cases include:- Your phone restarts
- The Yale Home App was force-quit
Away Mode
Your phone will attempt to unlock your lock the next time you are near it.What does it mean?
You are assumed to have left home, as well as the area around your home. Auto-Unlock will listen for your lock’s Bluetooth signal, and attempt to unlock your door the next time you are within 3 - 4.5 metres of your lock. This listening does not use significant battery power.How is it activated?
Automatically - You are placed in Away mode when your phone leaves the area around your home. This is typically about 200 meters away from your Yale Home Smart Lock, or a couple city blocks.
Manually - You can place yourself in Away mode by visiting Auto-Unlock Settings > Advanced Settings, and switching from Home mode to Away mode.PLEASE NOTE: If you are standing near your Yale Home Smart Lock when manually entering Away mode, your lock should unlock within a few seconds. This is expected behaviour, and will only happen because you are physically near your lock. This will not happen when you are away from home.
Errors
If you are automatically placed in Home mode because of an error, you will usually be given an option to re-enter Away mode.Troubleshooting
My door didn’t unlock when I expected it to:i. You may not have gone far enough away from home
- To enter Away mode, you must go further than 200 meters or a couple city blocks. Only then will Auto-Unlock attempt to unlock your door when you arrive home.
- You can make sure Auto-Unlock tells you when you’re far enough away by enabling the notification. Auto-Unlock notification settings can be found in Lock Settings > Auto-Unlock.
ii. Auto-Unlock may have reverted to Home mode because of an error
- Most of these cases will send you a notification, with an option to correct the issue before you arrive home. Causes include:
- Your phone was restarted
- The Yale Home App was force-quit
- A communication error with your lock
My door unlocked when I didn’t expect it to:
i. Auto-Unlock incorrectly thought you left home
ii. If you have very poor Wi-Fi or cellular connectivity. Your phone uses these to determine your current location.
iii. The location of your lock is set incorrectly. You can change this in Auto-Unlock Settings > Advanced Settings.
iv. Auto-Unlock didn’t see your lock when you came home
v. You entered through a door other than your Auto-Unlock enabled one.
vi. Bluetooth on your phone was turned off when you came home.
vii. Your lock’s batteries were very low.How does Yale Home use my location data?
Your location data is only stored on your phone within the Yale Home App. Yale does not collect or store your data remotely, and has no way of looking at your location data. For more information, please see our Privacy Policy.Factory resetting a Yale Home smart lock erases all lock settings, as well as owner- and guest-data, restoring it back to its original factory settings. A factory reset also removes the lock from any owners' or guests' keychain. A factory reset can be performed from within the Yale Home App provided you are within Bluetooth range of the host lock.
How to reset your Yale Home module
- Open the Yale Home App while you are in Bluetooth range of the lock
- Go to House Settings and select the host lock
- Open Lock Settings
- Scroll to Factory Reset
- Select RESET LOCK for iOS or RESET DEVICE for Android
PLEASE NOTE: The above steps reset both the module AND the lock and will erase all settings/pins. You will require a new master pin code. HomeKit is NOT reset when you factory reset the Yale Home module.
There is also an option to reset the host lock using a button located on the lock. This method of reset will reset the host lock and HomeKit. The location of the reset button differs depending on the model of host lock you have. Please see the manufacturer’s instructions for reset steps.
PLEASE NOTE: Resetting your host lock using the lock’s reset button may cause a Module Communication Error. Please read "Yale Home Module Communication Error" article under the Troubleshooting section for steps to resolve the error.
If you moved into a new home and there is a Yale Home Smart Lock installed, you will need to factory reset the device if the device is still associated with the previous owner. Contact Support for assistance resetting the lock.
Observe the following sequence when configuring your Yale Home module and HomeKit:
- Download the Yale Home App
- Install the lock on your door
- Install the Yale Home Module in the lock
- Configure the integration between HomeKit and the Yale Home App using the QR code located on the Terms and Conditions pamphlet included with your Yale Home Module
- Set up the lock in the Home app to complete the integration
PLEASE NOTE: You will not be able to set up the HomeKit unless the module is already seated in the lock.
PLEASE NOTE: You can get remote access via HomeKit either through Bluetooth (no Yale Connect bridge) or Wi-Fi with (Yale Connect bridge).
The Yale Connect bridge is only mandatory for remote access when using the Yale Home App.
For HomeKit, if using Bluetooth(no Yale Connect bridge) only, you must have a good Bluetooth connection between the HomeKit hub (Apple TV, HomePod, etc.) and the lock with the Yale Home module. If you find the Bluetooth connectivity unreliable, installing the Yale Connect Wi-fi bridge will improve the connectivity.Steps to set up HomeKit for your Yale Home Lock:
1. Verify the proper settings are enabled on your phone
Open the iPhone Settings (not Yale Home) and check the following:- At the top of the Settings in your iPhone, tap your name → iCloud → Ensure Home is enabled and Keychain shows as On.
- If you will be using HomeKit remotely (using an Apple TV, iPad, or Homepod), you need to have Two-Factor Authentication enabled. To navigate here, go back and select “Password & Security”
- Tap the upper left back button (text says Apple ID) → Tap the upper left button a second time (text says Settings) → Scroll down and find Privacy → HomeKit → Ensure Yale Home is enabled.
- Tap the upper left back button (text says Back) →Tap the upper left button a second time (text says Settings) → Scroll down to Yale Home → Ensure Home Data is enabled
2. Begin the HomeKit Setup
You will need to be standing next to your lock and have Bluetooth enabled.
Open the Yale Home app → Navigate to the Lock Status screen (red/green/gray circle) → Tap the Settings gear icon at the bottom right of the screen → Lock Settings → HomeKit settings → Select Enable Siri at the bottom.
Follow the In-App instructions.3. HomeKit is now set up
HomeKit is now set up with your lock. For remote access via HomeKit, if using Yale Home Module(no Yale Connect bridge) only, you must have a good Bluetooth connection between the HomeKit hub (Apple TV, HomePod, etc.) and the lock with the Yale Home module. If you find the connectivity unreliable, installing the Yale Connect Wi-fi bridge will improve the connectivityIf you have any issues, please reach out to our Customer Support Team.
If you have a HomeKit-enabled Smart Lock, adding a new Owner and giving them HomeKit access can be done at the same time.
For more information on sharing HomeKit access with other users, check out this article.